复制对象实例
我们知道在Java这样面向对象的语言中,对于非基本数据类型的对象,它的值实际上是引用值,也就是说Object b = a会导致b和a指向同一个实例,对任意一个引用的实例修改都会反映在这个相同的实例上。所以,如果要产生两个一模一样的实例,必须要重新实例化一个对象,并且同样的进行赋值。
以下面的简历类为例,想要多份一模一样的简历就需要实例化多个Resume对象,并分别设置相同的值,就好像手抄一样。
public class Resume {
	private String name;
	private String sex;
	private String age;
	private String timeArea;
	private String company;

	public Resume(String name) {
		this.name = name;
	}

	// 设置个人信息
	public void SetPersonalInfo(String sex, String age) {
		this.sex = sex;
		this.age = age;
	}

	// 设置工作经历
	public void SetWorkExperience(String timeArea, String company) {
		this.timeArea = timeArea;
		this.company = company;
	}

	// 显示
	public void Display() {
		System.out.printf("%s %s %s\n", name, sex, age);
		System.out.printf("工作经历:%s %s\n", timeArea, company);
	}

	public static void main(String[] args) {
		Resume a = new Resume("大鸟");
		a.SetPersonalInfo("男", "29");
		a.SetWorkExperience("1998-2000", "XX公司");

		Resume b = new Resume("大鸟");
		b.SetPersonalInfo("男", "29");
		b.SetWorkExperience("1998-2000", "XX公司");

		Resume c = new Resume("大鸟");
		c.SetPersonalInfo("男", "29");
		c.SetWorkExperience("1998-2000", "XX公司");

		a.Display();
		b.Display();
		c.Display();

		System.out.println(a == b);//false
		b = a;
		System.out.println(a == b);//true
	}
}
显然这种方法是非常繁琐的,重复代码很多,所以需要改进。
原型模式
面向对象的语言通常都会提供对象的拷贝方法,可以用于产生两个完全相同的实例对象。这种设计模式被称为原型模式(Prototype),用原型实例指定创建对象的种类,并且通过拷贝这些原型创建新的对象。
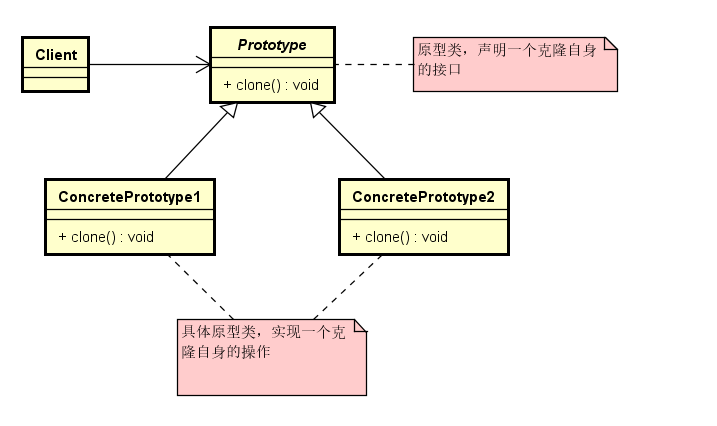
原型模式就是从一个对象再创建另外一个可定制的对象,而且不需要知道任何创建的细节。原型类需要定义一个抽象的clone接口方法
public abstract class Prototype {
	private String id;

	// Constructor
	public Prototype(String id) {
		this.id = id;
	}

	// Property
	public String getId() {
		return id;
	}

	public abstract Prototype clone();
}
而具体实现类需要具体实现clone方法
public class ConcretePrototype1 extends Prototype {

	public ConcretePrototype1(String id) {
		super(id);
	}

	@Override
	public Prototype clone() {
		Prototype prototype = new ConcretePrototype1(this.getId());
		return prototype;
	}

	public static void main(String[] args) {
		ConcretePrototype1 p1 = new ConcretePrototype1("I");
		ConcretePrototype1 c1 = (ConcretePrototype1) p1.clone();
		System.out.printf("Cloned: %s\n", c1.getId());//Cloned: I

	}
}
Java中Cloneable实现
Java中所有类都继承了java.lang.Object,而这个Object类提供了一个clone的native方法,只要类声明实现了Cloneable接口就可以调用这个clone方法。需要注意的是,clone方法会检查是否实现了Cloneable接口而抛出CloneNotSupportedException,同时在没有重写方法的情况下,返回的是Object对象,需要进行类型转换。
public class Resume implements Cloneable{
	private String name;
	private String sex;
	private String age;
	private String timeArea;
	private String company;

	public Resume(String name) {
		this.name = name;
	}

	// 设置个人信息
	public void SetPersonalInfo(String sex, String age) {
		this.sex = sex;
		this.age = age;
	}

	// 设置工作经历
	public void SetWorkExperience(String timeArea, String company) {
		this.timeArea = timeArea;
		this.company = company;
	}

	// 显示
	public void Display() {
		System.out.printf("%s %s %s\n", name, sex, age);
		System.out.printf("工作经历:%s %s\n", timeArea, company);
	}

	public static void main(String[] args) {
		Resume a = new Resume("大鸟");
		a.SetPersonalInfo("男", "29");
		a.SetWorkExperience("1998-2000", "XX公司");

		Resume b = null;
		try {
			b = (Resume) a.clone();
		} catch (CloneNotSupportedException e1) {
			e1.printStackTrace();
		}

		a.Display();
		b.Display();

		System.out.println(a == b);//false
	}
}
通过对方法覆盖的方法,可以在内部处理掉这个异常
	public Resume clone() {
		Object obj = null;
		try {
			obj = super.clone();
		} catch (CloneNotSupportedException e) {
			e.printStackTrace();
		}
		return (Resume) obj;
	}
浅拷贝与深拷贝
Object.clone()方法是一种浅拷贝,对于基本值类型是直接复制值,而对于引用类型是复制引用地址。
还是以上面的简历对象为例,这次我们新增一个附件类Attachment,类似于很多招聘网站上上传的附件简历
public class Attachment {
	private String name;

	public String getName() {
		return name;
	}

	public void setName(String name) {
		this.name = name;
	}

	public void download() {
		System.out.println("下载附件,文件名为" + name);
	}
}
修改后的简历类如下,可以看到对attachment实例的修改会直接影响到实例a和它拷贝产生的实例b,说明a和b中的attachment是指向同一个地址上的实例对象。
public class Resume implements Cloneable{
	private String name;
	private String sex;
	private String age;
	private String timeArea;
	private String company;
	private Attachment attachment;

	public Resume(String name) {
		this.name = name;
	}

	// 设置个人信息
	public void SetPersonalInfo(String sex, String age) {
		this.sex = sex;
		this.age = age;
	}

	// 设置工作经历
	public void SetWorkExperience(String timeArea, String company) {
		this.timeArea = timeArea;
		this.company = company;
	}

	// 显示
	public void Display() {
		System.out.printf("%s %s %s\n", name, sex, age);
		System.out.printf("工作经历:%s %s\n", timeArea, company);
		attachment.download();
	}

	public Resume clone() {
		Object obj = null;
		try {
			obj = super.clone();
		} catch (CloneNotSupportedException e) {
			e.printStackTrace();
		}
		return (Resume) obj;
	}

	public Attachment getAttachment() {
		return attachment;
	}

	public void setAttachment(Attachment attachment) {
		this.attachment = attachment;
	}

	public static void main(String[] args) {
		Resume a = new Resume("大鸟");
		a.SetPersonalInfo("男", "29");
		a.SetWorkExperience("1998-2000", "XX公司");
		Attachment attachment = new Attachment();
		attachment.setName("附加简历");
		a.setAttachment(attachment);

		Resume b = null;
		b = a.clone();

		a.Display();//下载附件,文件名为附加简历
		b.Display();//下载附件,文件名为附加简历

		System.out.println(a == b);//false

		attachment.setName("");
		a.Display();//下载附件,文件名为
		b.Display();//下载附件,文件名为
	}
}
那么,如果我们希望对引用对象也是拷贝一份新的实例对象,就需要做到深拷贝。当然,直接修改Resume的clone方法,new一个Attachment实例,再设定值也可以,或者可以将Attachment也实现Cloneable接口,在Resume拷贝时拷贝一份附件即可
public class Attachment implements Cloneable {
	private String name;

	public String getName() {
		return name;
	}

	public void setName(String name) {
		this.name = name;
	}

	public void download() {
		System.out.println("下载附件,文件名为" + name);
	}

	public Attachment clone() {
		Attachment obj = null;
		try {
			obj = (Attachment) super.clone();
		} catch (CloneNotSupportedException e) {
			e.printStackTrace();
		}
		return obj;
	}
}
Resume的clone方法做如下修改,这时候再运行测试类,只有a实例的附件值被修改了
	public Resume clone() {
		Resume obj = null;
		try {
			obj = (Resume) super.clone();
		} catch (CloneNotSupportedException e) {
			e.printStackTrace();
		}
		obj.setAttachment(obj.getAttachment().clone());
		return obj;
	}
Java序列化实现的深拷贝
除了手动实现深拷贝之外,Java本身还提供了一个接口,那就是Serializable接口提供的序列化结合ObjectStream来完成深拷贝。首先,Attachment和Resume两个类都需要实现Serializable接口,然后在Resume里面实现深拷贝方法。可以从测试结果中看到,深拷贝产生的实例c是不受修改attachment的影响的。
	public Resume deepClone() throws IOException, ClassNotFoundException {
		// 将对象写入流中
		ByteArrayOutputStream bao = new ByteArrayOutputStream();
		ObjectOutputStream oos = new ObjectOutputStream(bao);
		oos.writeObject(this);

		// 将对象从流中取出
		ByteArrayInputStream bis = new ByteArrayInputStream(bao.toByteArray());
		ObjectInputStream ois = new ObjectInputStream(bis);
		return (Resume) ois.readObject();
	}

	public static void main(String[] args) throws ClassNotFoundException, IOException {
		Resume a = new Resume("大鸟");
		a.SetPersonalInfo("男", "29");
		a.SetWorkExperience("1998-2000", "XX公司");
		Attachment attachment = new Attachment();
		attachment.setName("附加简历");
		a.setAttachment(attachment);

		Resume b = a.clone();
		Resume c = a.deepClone();

		a.Display();// 下载附件,文件名为附加简历
		b.Display();// 下载附件,文件名为附加简历

		System.out.println(a == b);// false

		attachment.setName("");
		a.Display();// 下载附件,文件名为
		b.Display();// 下载附件,文件名为
		c.Display();// 下载附件,文件名为附加简历
	}